On January 2, 2022, Scott McCleod posted the following on Facebook.
There were many comments on his post. I was delighted to see many people I used to follow join the discussion. People questioned the viability of blogs, people missed the community of bloggers, and people migrated to other platforms such as Medium.com. Fortunately, some are still blogging.
I realized that I had quit reading blogs when the RSS reader I used died and I couldn’t find a replacement. When I quit reading blogs, I also stopped writing on my own blog. That meant I was doing less reflecting on my practice.
As he so often does, Juan Miguel Guhlin added useful resources to the discussion.
All of this was enough to get me exploring. FeedBro plugged in easily to my Brave browser. It was easy to create a few folders and then start adding blogs. With the extension installed, I can click on the extension in my bookmarks bar to find the feeds on a given page and add them to my reader.
I spent a happy hour avoiding packing for my flight back to Singapore by adding the blogs listed in the comments of Scott’s post and searching for other relevant blogs. Much to my dismay, a great many people have quit blogging. Even looking at curated lists of blogs, many people hadn’t posted in 2 or more years. I suspect the pandemic is partially to blame. The pace of distance teaching didn’t leave much mental space for reflection.
I was disheartened to see how many educational blogs have become commercials for their own materials on TPT. I am glad TPT exists. I have found many excellent resources there. However, I read blogs to learn and reflect. The good thinking that went into creating the resources is often missing from their blogs. I also noticed how polished blogs look nowadays.
This is a very plain blog post at the moment. I can see that my theme is no longer supported and for some reason, all of the tags are in an unattractive clump at the top of the blog. I will see if I can figure out how to make this more attractive. I will be interested to see if I actually resume blogging, and if anyone reads it. In the next six months, I will be moving back to the US after 17 years in Singapore. I need to figure out the logistics of doing that with three cats. I am not certain if that will leave me any mental space for blogging. Here’s hoping.
And here’s a glimpse of today’s weather in Minnesota.
Now that I am in the 4th quarter of my third year back in the classroom, I have finally evolved a general lesson structure that is working well. The next few blog posts with explain the typical parts of my math lessons.
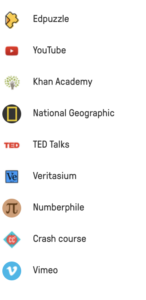
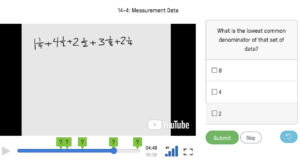
The lesson begins the night before. I flip my initial instruction by using the free, ad-free website EdPuzzle. This site allows me to embed quizzes into tutorials. There is a bank of videos made by other teachers which is accessible in EdPuzzle. The site also allows you to search other sites, such as Khan Academy and YouTube.
However, if you import from other sites, you need to embed your own quizzes. I make my quizzes multiple choice. If I construct them well, I get useful information from which incorrect answers a child chooses. I also choose multiple choice so that students get immediate feedback. Brain research shows that optimal learning comes when feedback is received within 20 minutes of completing an assignment.
Students watch the video at home, or in class if they finished the previous day’s assignments before the end of class. There is a setting which makes it impossible for students to skip the video and just jump to each of the questions. Of course, a child who really doesn’t want to take part will just not listen, but that happens during live lectures also.
I instruct students that they must work along with the video on a whiteboard or on paper. I am certain that many of them do not do that. I could require them to write it on paper and turn it in. That is a logical next step.
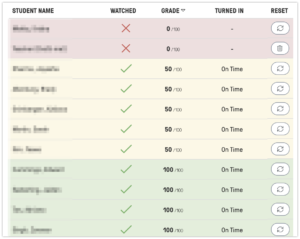
After students complete the video, my dashboard shows the results in a color-coded list, with the lowest scores at the top.
I can drill down into the student level to see which problems they had incorrect, and how they answered. I use this information to adjust the next day’s lesson. Usually my assistant and I use it to know who to check in, or even sit with during the guided instruction.
A number of factors motivated me to flip my math instruction. By fifth grade, most of my students don’t have someone at home helping them with homework. That can make homework frustrating, or detrimental if they work all of the problems incorrectly.
Another problem is the time it took in class to correct the homework, but that wasn’t time well spent. I didn’t have time to use the data to address misconceptions, and the corrections are coming too late to make much impact on student learning.
Finally, since homework is not included in their grade, many children are more motivated to get it done than get it correct. All-in-all, it wasn’t working. It is a lot of working getting this set up for every lesson, but I am pleased with how it working.
I have only one problem with this website. It currently has a few bugs which occasionally cause some of the quizzes to skip or not display all of the information. They are working to solve this bug.
A dear colleague, Mariel Slater, is moving on from the school where we teach. I have learned much from her, and deeply respect her knowledge, her teaching strategies, and the joyful care with which she teaches children.
She has asked for a meeting so she can write down some of the ways I differentiate instruction in the classroom using technology. That lead to me realizing the information might be useful to others as well. Therefore, this is hopefully the first in a series of blog posts about the systems I am currently using.
But first, a caveat: I have the good fortune to be 1:1 with iPads and to have access to a class set of Chromebooks. The iPads go home with my students, making it feasible for me to assign homework that requires technology. All of my students have internet at home..
Our first topic is typing skills. When I was a technology teacher, I did the same thing each year, and received the same, dismal results. We would spend time in class typing, and I would ask teachers to assign it as homework.
At the start of the school year, most fourth graders were typing an adjusted 3-5 words per minute. By the end of the year, they were usually typing around 7 words per minute. Our goal was that they would be typing 10 words per minute with 90% accuracy for fourth graders, and 15 words per minute with 95% accuracy. Clearly, our strategy wasn’t working.
We know that many fine motor skills, such as typing, are most easily gained by working frequently for a short amount of time, rather than less frequently for a longer time. However, our level of technology access didn’t present a better option. This was further complicated by the typing program. We tried different typing tutors, but almost all children hated practicing. That was not a recipe to encourage the amount as practice as needed.
Then one year, we had netbooks in the classroom. At the end of that year, as I had the students take their end of the year typing tests, I was pleasantly surprised. In one class, the children were typing 20, 30, even 40 wpm with 95% accuracy. I was flabbergasted.
I started asking children about how they made such impressive gains. Again and again, I heard the same thing. When they finished their math assignment each day, they would play NitroType. One girl even told me that she didn’t much like it, but since everyone else was playing it, she did too. Typing growth via peer pressure? Who knew? Equally surprising to me was their form. Although some of them had non-standard fingering, they all had safe hand and arm positions.
Nitrotype is a free typing website. Students can use their Google login or create a stand alone account.
There are no lessons. There is no way for teachers to track student progress. Instead, when students log in, they are given a race car.
When they click the Enter a Race button, they are paired with other players. They are not paired by skill level, but by whomever is waiting to race. This intimidates children at first.
The faster and more accurately they type, the faster their car moves. If they win the race, they earn money. When they earn enough, they can purchase a better car. The children claim that the better cars go faster. I haven’t played enough to know for certain.
Other motivating factors are leaderboards and the option to invite people you know to race via email. Otherwise, you are paired with whomever is waiting to race at that time. All you can see is their username. You cannot contact send them text messages or see their real names.
When I moved back into the classroom, I had the opportunity to test it out myself. Each year, I have seen good results for the children who enjoy playing it. After I introduce it, many children beg to be allowed to play it when they finish their assignments.
Here is how I use it. Early in the year, I have students use the TypingTest.com site to take a pre-assessment. They use the 1-minute test as a warm up, and then they use the 1-minute test as a test. At the end of the test, the site displays their typing statistics. Students take a screenshot, and post it to their blog. At the end of each term, they test again and post their results. By the end of December, many of them have results such as these.
Particularly motived students end up with results such as these by December.
By March, many of them are up to the average range, which is 25 wpm and higher. I always have to explain to them that this score isn’t average for kids, it is average for adults. That perspective fills them with pride in their achievements.
This growth is not only due to working on it when they find time in class. Many of them go home and play there. They even make arrangements to race against each other after school.
So, what are the problems? The biggest problem is parents. At back to school night I tell them about the program, and the successes I’ve had with it. I explain how typing skills typically develop in children. I’ve gleaned this from my years as a tech teacher, and later I read it in a journal.
Typically, young children start typing with the pointer finger of their dominant hand. Over time, they add in the pointer finger of their non-dominant hand. With instruction, they start using the home row, but still only typing with two, and then three fingers on each hand. If they are taught long enough, they finally add in their pinkies.
Most children’s hands are not big enough to reach the number keys from the homeroom until they are in fifth or sixth grade.
I also explain, that when children begin playing Nitrotype, they will usually only type with two fingers, and they will be staring at the keys. This is okay. They are learning the key locations. They don’t know they are doing this, but they are trying to win, and the same thing happens over time. Once they know where they keys are, then I start leaning on them to use the home row. However, my fastest typist this year still doesn’t use it. He’s typing around 46 wpm with 99% accuracy, and his wrists are at a safe angle. He is a small person, so I suspect his hands really are too small to use the home row well. However, it isn’t holding him back.
In any case, nothing I say seems to reassure the parents. At the start, all they see is their child frantically staring at the keyboard, banging on the keys with two fingers. Nothing about that says, “Learning to type,” to them. Even worse, it looks like they are merely playing video games, and getting more screen time.
Fortunately, if parents allow their child to continue, by conference time in October, there is good growth to show them to bolster my claims.
Another problem is interest. If a child isn’t interested in a racing game, they don’t play, and don’t show any growth. This year, I found that the TypingTest.com site has a children’s typing tutor. This free, game-driven site is called Typetastic!
It teaches typing through a series of games. They are not as fun as the car racing in NitroType, but they are much more motivating than a regular typing tutor. There are 13 free levels, each with a different game.
Unfortunately, I cannot speak to the effectiveness of the website, because none of my students have used it for very long. After our March typing test, many of the students who hadn’t been using NitroType, so their typing score, compared it to their classmate’s scores, and started using NitroType. Not all, but many.
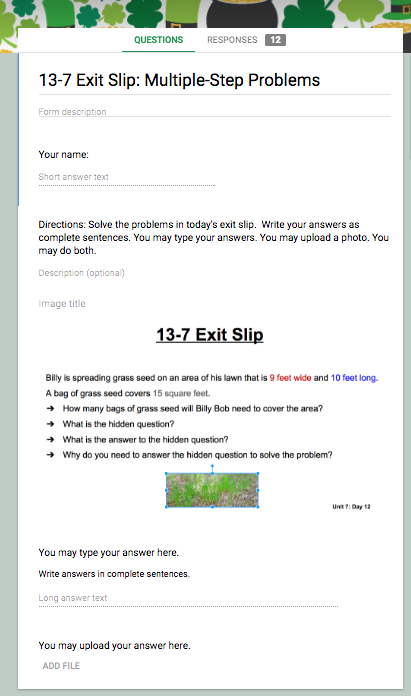
Back in September, I posted about how my math exit slip process had evolved over time, becoming more effective through the use of technology. My system has taken another term, which has made it easier for everyone involved.
The process I was using in September used the Formative.com website. That website has many features I was not using. Since I wasn’t gaining benefits from those other features, Formative was a big, clunky tool for my purpose. Creating and viewing the exit slips was a slow process for me. Using the web app or the iPad app was a slow process for my students. The drawing tool was rough, and the text tool non-existent on the iPad which made their work difficult to read and encouraged sloppiness. It was better than anything else I had tried, but it wasn’t the formative assessment nirvana I was seeking.
A few months ago, I read about a new Google Forms feature. It is now possible for form participants to upload a file. For me, that was the missing piece. (You can read Google’s announcement here. )
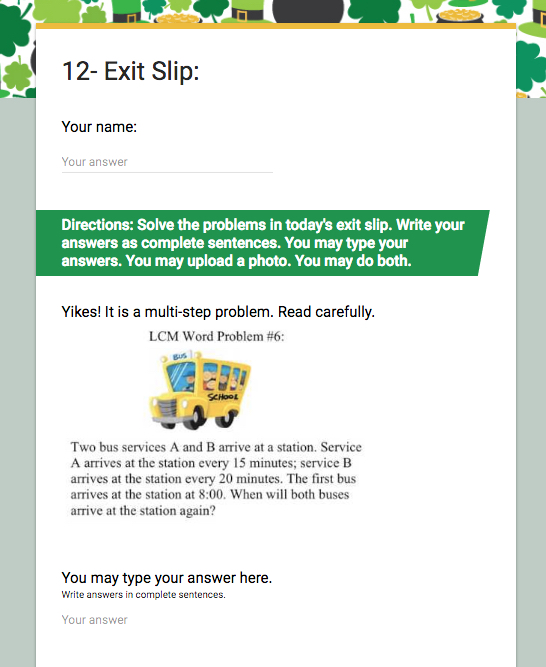
Armed with this new tool, I set about revising my process yet again. For each math unit, I create a Google form to use as a template. It has all of the needed parts EXCEPT the item that lets them upload files. For each exit slip, I make a copy of that template and rename it accordingly. Here is this unit’s template. (Forgive me the St. Pat’s theme. They are kids. They seem to appreciate the theme change each unit.)
Notice that I included a name line. I could have the form automatically capture their username, but that requires logging in. My students have been good about putting their name on their submissions, so this has saved them time.
The question with the bus is just a photo. Each day’s exit slip is already in the lesson’s Google Presentation. I snap a screen shot of it and upload it in place of the image in the template.
My students have three options each day of how to complete the exit slip. Their first choice is to type their answer. Their second choice is to upload an image. Sometimes that is a screen capture, and other times is it a photo of a physical model, or something they have worked on whiteboard or notebook. Their final choice is to both type and upload. I’m surprised at how often they choose the latter. To give them this choice, neither item is a required option in the form
Next, I add the file upload item. I can’t have that item already in the template. When I tried that, the forms always had a problem and deleting the item didn’t fix it. Instead, I add that item to each exit slip. It is one of the item types when you select to add an item.
When you select that option, you can choose how many files a participant can upload. I let students upload 5. Since my students are supposed to show me their exit slip before they submit it, student often end up revising and adding their revised image. Brain research suggests that feedback is most useful within 20 minutes of completing a project. This lets me provide that 1-on-1-just-in-time reteaching that seems to make the exit slip educational for them and an assessment tool for me.
With the last item in place, I grab the URL of the live form, and add it to the unit’s math assignment page.
Most of my students complete the exit slip in class. For students who don’t, I can view their slips either in the form itself, or by sending the form responses to a spreadsheet.
From the first day, my students liked the Google Form exit slips. The tool no longer gets in the way of them showing what they know. All around, it’s a win.
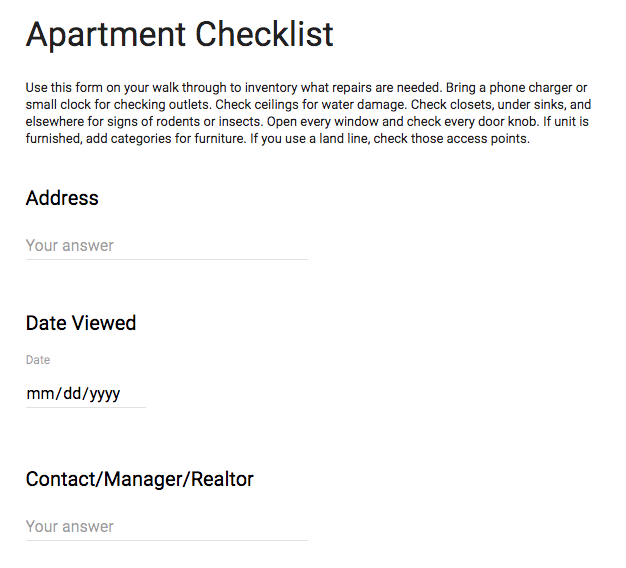
If you are searching for an apartment, a condo or home to rent, you might find it useful to use a checklist while viewing units.
I combed a bunch of apartment hunting sites like Zillow, All State, and Apartment Guide.com to find out what to look for when viewing condos. Then I combined the information into a Google form.
The form starts with basic info regarding the unit. Since I am only using it on second viewings, I didn’t include basic info such as rental price or square feet.
For each part of the condo, I created a heading, a list of items I wanted to evaluate, and a general comments section. The radio buttons made the form really quick to complete.
For the kitchen, I had an overall condition section, and a section for each major appliance.
When I was ready to start using it, I sent myself the link to the live form. I clicked that link on my phone, and I was all set. For the first time ever, I didn’t forgot to check on something while doing the second walk through. We now have all of the information we need to enable our realtor to create the Letter of Intent.
When I returned home, I was able to view the information in the form. I could also save them to a spreadsheet, but that is more difficult to view.
If you want a copy of that you can use and tailor to meet your needs, start with this template. It is essential that you make a copy and save it to your own Google Drive. I’ve included directions in the template to help you do that. If you don’t follow them, chaos will ensue. (You have been warned.) You can delete the directions after you follow them.
[UPDATE: Use this link to the template. It will force you to make a copy.]
My checklist is tailored to condos here in Singapore. If I were using this back home in Minnesota, I’d add additional items, such as heating, smoke and carbon monoxide detectors, radon testing results, etc. You are welcome to tailor your own copy to best meet your needs.
I’d love to hear how it works for you. Good home hunting!
Many teachers on my team use a paper exit slip in math class each day and that works just fine for them. In contrast, managing piles of paper makes me crazy, and the paper exit slips were not easy to refer back to without lots of time spent filing. Over the past year, those frustrations pushed me to develop something that worked better for me and my students. Here is how it looks now.
I created a free teacher account on the Formative website. The first time my students logged in to it, they linked Formative to their school Google account, and then inserted a class code to get them to my class section. After that, they added Formative as a desktop shortcut on their iPad home screens. The shortcut ends up with the colorful Formative logo on it which makes it easy for the students to locate it.
Inside Formative, I organize the exit slips by date. For example, todays was Exit Slip 09/02. In my dashboard, I am able to organize assignments in folders. Unfortunately, the folders are not visible to the students; they see the assignments in one long list.
There are many formative assessment tools online. The main reason I chose Formative over Nearpod, EDPuzzle, or other competitors, is the variety of response options. In addition to the usual multiple choice, true/false and short answer, there is a Show Your Work option. That is what I choose for exit slips.
The Show Your Work option allows me to provide each child with a blank space in which they show their work. Alternately, I can upload a graphic, such as grid paper, a coordinate graph, etc. which they use in their response.
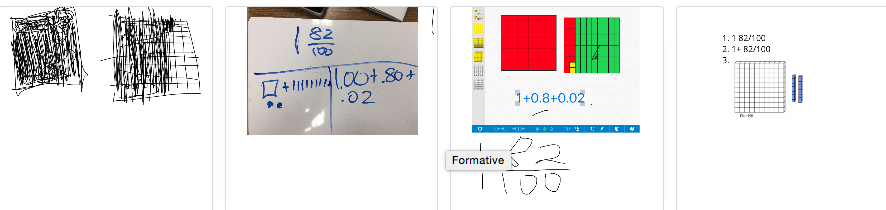
When students start working, I can view their work in Formative’s live results section. Their responses appear as thumbnails in a grid. Here is a screen capture of the first row of responses. (I have cut off the names here to protect the children’s privacy.)
You can see that my students have grasped that they can use a wide variety of tools when constructing their response. One child (who hasn’t finished) used the drawing tool in Formative. Another used her whiteboard and then uploaded a photo. Another child used the Number Pieces app on his iPad. He uploaded a screen shot and combined it with the drawing tool in Formative. Another child pulled images of base ten blocks off the web to use in his response.
This flexibility allows children to tackle mathematical challenges and communicate mathematical thinking using the models and other tools which they best understand. Since there is little to no scaffolding in Formative, the children’s exit slips give me a more powerful look into their thinking than the work they do during guided practice or the independent practice work from their textbook.
This daily look into their thinking was soon informing my teaching, as good formative assessment should do. I would review their exit slips each night, and that often lead me to revise the next day’s instruction and form small groups for targeted reteaching. However, while the exit slips were teaching me what I needed to know, they were not directly helping the children grow. That lack prompted another change in my process.
Brain research indicates that there is a window in which feedback is the most useful. I’ve read that receiving the feedback within 20 minutes of completing a task best supports learning. Giving children feedback on their exit slips the next day is well outside of that optimal time frame.
With that in mind, I started requiring students to show me their exit slip before they submitted it. I quickly found that those brief conferences were some of my most effective moments of math instruction each day. I was catching errors and correcting misconceptions moments after the children demonstrated them. In our brief conferences, I could see and hear connections being made and learning taking place.
Now at this point in my new school year, we are still establishing the exit slip routine. Students are sometimes uploading their responses without conferencing with me. As a result, most of the examples I have embedded into this post show errors, or misrepresentations which point to gaps in the children’s understanding. The examples on this page are responses to this challenge: describe 1.82 in three different ways. One of the ways must be a neat and clear base 10 model.
Let’s look at one child’s response.
Is it incorrect? It certainly isn’t the most efficient way to model 1.82 since the hundredths are not with the tenths. This child and I had a quick and focused discussion about her response. After that, she gave me a treat that teachers live for. Her eyes went wide, she said, “Oh! I see a better way to draw it” and enthusiastically rushed off to make changes. My experiences have shown me that if the other children had checked in with me before submitting, most would have shown similar growth.
In addition to the math exit slips, I use Formative a few times per week for quick reading responses to our read aloud. I expect longer, more detailed responses to their independent reading. However, despite their notes, they find responses to our read aloud book more challenging since they do not have the text in hand. Students share their read aloud responses with reading partners at the start of our next read aloud session. Discussing them the next day is not ideal, but it has still been useful.
In spite of how successful our use of the Formative website has been, I have a few frustrations with the it.
As mentioned above, students can’t see folders, just assignments, so the list gets long and children have trouble navigating it.
If you upload media, such as a picture or video, and then post a question beneath it, the student responses are difficult to view.
The scoring process is cumbersome. I have quit entering scores since my students are showing their responses to me in person.
The comments feature is only visible to the teacher; students can’t see it.
The tool set varies between the iPad and the computer. The computer has a text typing tool which is sorely missed when we login on our iPads. Even with a stylus, it is difficult to write neatly with the drawing tool on the iPad. However, on the computer it is difficult to draw.
The team at Formative has said a big update will be out soon. I hope it addresses some of my issues, but I suspect it will focus on the standards tracking features which I am not using.
All in all, the Formative website is proving to be an effective and efficient tool for formative assessment. Its flexibility allows children a lot of latitude in the tools they use to solve math challenges and communicate their thinking. The ease with which I can scan the results allows me to quickly assess student progress. The information I glean from Formative allows me to revise lesson plans, and adjust student groupings. When my feedback to formative posts is timely, I often see students’ misconceptions being corrected in our conferences. Despite my frustrations with some aspects of the website, I enthusiatically recommend this process to any upper elementary class who has student iPads.
Are you using technology to improve your formative assessment? I’d love to hear what you are doing.
2017/03/21 Update: As well as this was working for me, it took a long time for me to create the exit slips, a long time for kids to write/upload their answers, and a long time for me to view them using Formative.com. Since I am not using the standard tracking features in Formative, I quit using it when Google made it possible for users to upload a file when completing a Google Form. When I get a chance, I’ll write a new post since the process is easier for everyone with a Google Form.


 The shortcut ends up with the colorful Formative logo on it which makes it easy for the students to locate it.
 Is it incorrect? It certainly isn’t the most efficient way to model 1.82 since the hundredths are not with the tenths. This child and I had a quick and focused discussion about her response. After that, she gave me a treat that teachers live for. Her eyes went wide, she said, “Oh! I see a better way to draw it” and enthusiastically rushed off to make changes. My experiences have shown me that if the other children had checked in with me before submitting, most would have shown similar growth.