Many teachers on my team use a paper exit slip in math class each day and that works just fine for them. In contrast, managing piles of paper makes me crazy, and the paper exit slips were not easy to refer back to without lots of time spent filing. Over the past year, those frustrations pushed me to develop something that worked better for me and my students. Here is how it looks now.
I created a free teacher account on the Formative website. The first time my students logged in to it, they linked Formative to their school Google account, and then inserted a class code to get them to my class section. After that, they added Formative as a desktop shortcut on their iPad home screens. The shortcut ends up with the colorful Formative logo on it which makes it easy for the students to locate it.
Inside Formative, I organize the exit slips by date. For example, todays was Exit Slip 09/02. In my dashboard, I am able to organize assignments in folders. Unfortunately, the folders are not visible to the students; they see the assignments in one long list.
There are many formative assessment tools online. The main reason I chose Formative over Nearpod, EDPuzzle, or other competitors, is the variety of response options. In addition to the usual multiple choice, true/false and short answer, there is a Show Your Work option. That is what I choose for exit slips.
The Show Your Work option allows me to provide each child with a blank space in which they show their work. Alternately, I can upload a graphic, such as grid paper, a coordinate graph, etc. which they use in their response.
When students start working, I can view their work in Formative’s live results section. Their responses appear as thumbnails in a grid. Here is a screen capture of the first row of responses. (I have cut off the names here to protect the children’s privacy.)
You can see that my students have grasped that they can use a wide variety of tools when constructing their response. One child (who hasn’t finished) used the drawing tool in Formative. Another used her whiteboard and then uploaded a photo. Another child used the Number Pieces app on his iPad. He uploaded a screen shot and combined it with the drawing tool in Formative. Another child pulled images of base ten blocks off the web to use in his response.
This flexibility allows children to tackle mathematical challenges and communicate mathematical thinking using the models and other tools which they best understand. Since there is little to no scaffolding in Formative, the children’s exit slips give me a more powerful look into their thinking than the work they do during guided practice or the independent practice work from their textbook.
This daily look into their thinking was soon informing my teaching, as good formative assessment should do. I would review their exit slips each night, and that often lead me to revise the next day’s instruction and form small groups for targeted reteaching. However, while the exit slips were teaching me what I needed to know, they were not directly helping the children grow. That lack prompted another change in my process.
Brain research indicates that there is a window in which feedback is the most useful. I’ve read that receiving the feedback within 20 minutes of completing a task best supports learning. Giving children feedback on their exit slips the next day is well outside of that optimal time frame.
With that in mind, I started requiring students to show me their exit slip before they submitted it. I quickly found that those brief conferences were some of my most effective moments of math instruction each day. I was catching errors and correcting misconceptions moments after the children demonstrated them. In our brief conferences, I could see and hear connections being made and learning taking place.
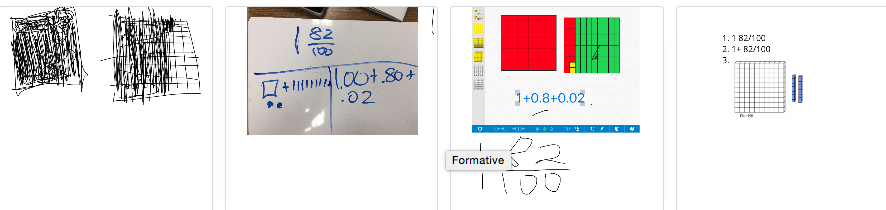
Now at this point in my new school year, we are still establishing the exit slip routine. Students are sometimes uploading their responses without conferencing with me. As a result, most of the examples I have embedded into this post show errors, or misrepresentations which point to gaps in the children’s understanding. The examples on this page are responses to this challenge: describe 1.82 in three different ways. One of the ways must be a neat and clear base 10 model.
Let’s look at one child’s response.
Is it incorrect? It certainly isn’t the most efficient way to model 1.82 since the hundredths are not with the tenths. This child and I had a quick and focused discussion about her response. After that, she gave me a treat that teachers live for. Her eyes went wide, she said, “Oh! I see a better way to draw it” and enthusiastically rushed off to make changes. My experiences have shown me that if the other children had checked in with me before submitting, most would have shown similar growth.
In addition to the math exit slips, I use Formative a few times per week for quick reading responses to our read aloud. I expect longer, more detailed responses to their independent reading. However, despite their notes, they find responses to our read aloud book more challenging since they do not have the text in hand. Students share their read aloud responses with reading partners at the start of our next read aloud session. Discussing them the next day is not ideal, but it has still been useful.
In spite of how successful our use of the Formative website has been, I have a few frustrations with the it.
As mentioned above, students can’t see folders, just assignments, so the list gets long and children have trouble navigating it.
If you upload media, such as a picture or video, and then post a question beneath it, the student responses are difficult to view.
The scoring process is cumbersome. I have quit entering scores since my students are showing their responses to me in person.
The comments feature is only visible to the teacher; students can’t see it.
The tool set varies between the iPad and the computer. The computer has a text typing tool which is sorely missed when we login on our iPads. Even with a stylus, it is difficult to write neatly with the drawing tool on the iPad. However, on the computer it is difficult to draw.
The team at Formative has said a big update will be out soon. I hope it addresses some of my issues, but I suspect it will focus on the standards tracking features which I am not using.
All in all, the Formative website is proving to be an effective and efficient tool for formative assessment. Its flexibility allows children a lot of latitude in the tools they use to solve math challenges and communicate their thinking. The ease with which I can scan the results allows me to quickly assess student progress. The information I glean from Formative allows me to revise lesson plans, and adjust student groupings. When my feedback to formative posts is timely, I often see students’ misconceptions being corrected in our conferences. Despite my frustrations with some aspects of the website, I enthusiatically recommend this process to any upper elementary class who has student iPads.
Are you using technology to improve your formative assessment? I’d love to hear what you are doing.
2017/03/21 Update: As well as this was working for me, it took a long time for me to create the exit slips, a long time for kids to write/upload their answers, and a long time for me to view them using Formative.com. Since I am not using the standard tracking features in Formative, I quit using it when Google made it possible for users to upload a file when completing a Google Form. When I get a chance, I’ll write a new post since the process is easier for everyone with a Google Form.
Update: This month, the app switch to a subscription format without warning. If you had purchased the app previously, it was supposed to allow you to revert. Unfortunately, that feature didn’t work for me and it deleted all of my routines. I searched their website, but couldn’t find any customer support, so I am done with the Yoga Studio app. However, I am still using this yoga routine and am very pleased with it.
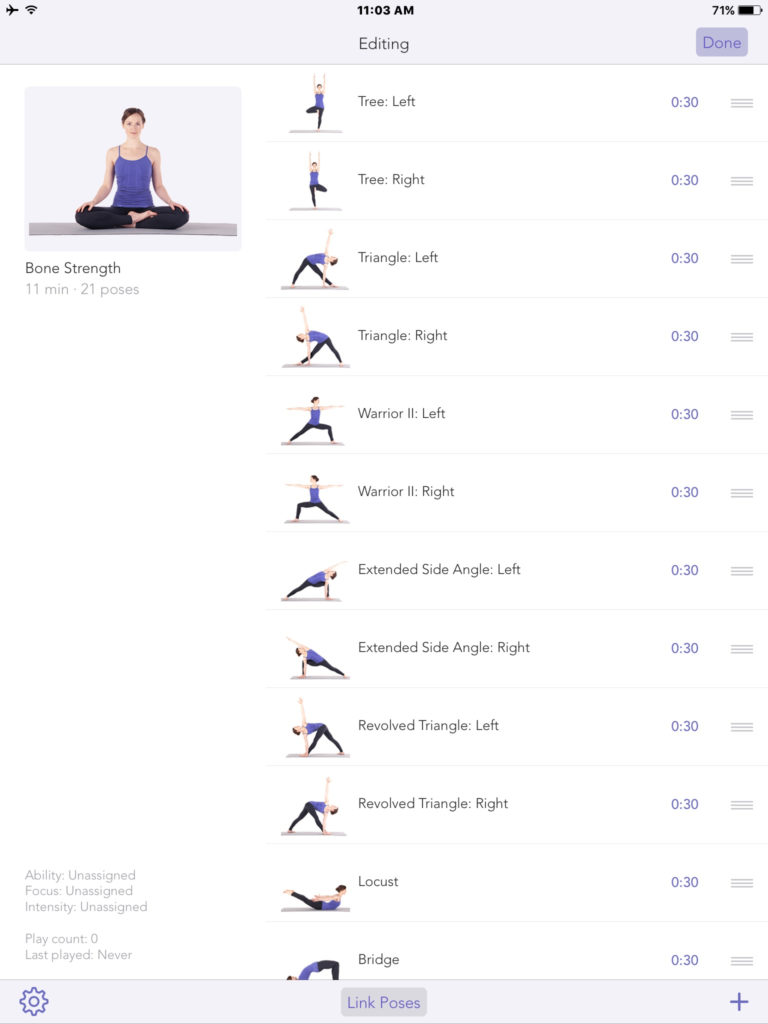
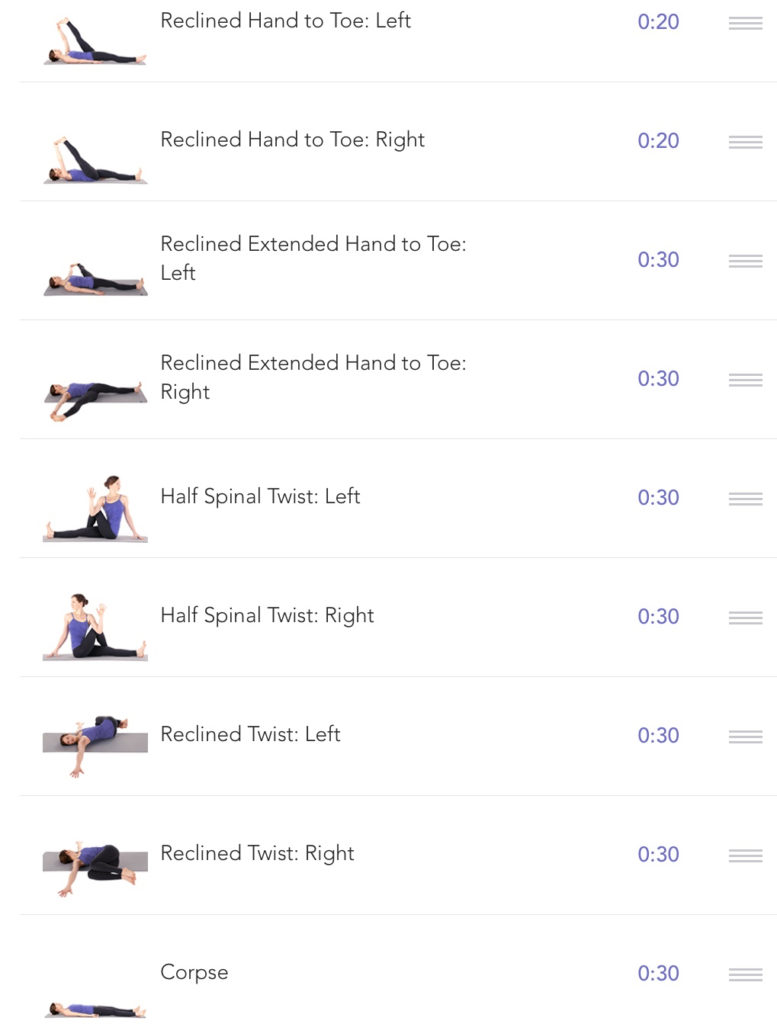
It is a common belief among medical professionals that it is very difficult or even impossible for adults to gain significant bone mass. Therefore, a post written by written by Jane E. Brody on the New York Times’ Wellness blog brings surprising and encouraging news.
The post, dated December 21, 2015 is titled 12 Minutes of Yoga for Bone Health . It discusses an initial study, and its ten-year follow up study. Both had participants complete a 12-pose yoga routine daily or at least every other day for a decade. The average age of the 227 participants upon joining the study was 68, and 83 percent had osteoporosis or its precursor, osteopenia. The results of the study were impressive.
Improvements were seen in bone density in the hip as well, but they were not statistically significant.
Now that I am on summer vacation, I dug out the article from my Pinterest boards and read through it more thoroughly. Although I do not currently practice yoga, I have practiced it almost daily for much of my adult life. I found the idea of increasing bone density while also reaping the other benefits of yoga appealing.
To help me with the routine, I decided to pull up the highly rated Yoga Studio app on my iPad. I had gotten the app when it went free; it usually cost $3.99.
One feature of the app is to create custom routines. So, I set up a “class” of the poses listed in the article. All of the poses were in the app, but some of them went by different names. Fortunately, I had also found this Lifehacker.com article regarding the same study. It showed photos of each pose and included their Sanskrit names. That allowed me to find each one on Youtube and it gave me alternate names for the poses. Here are screen shots so you can see the names used in the app.
Once I had the routine set up, the app let me set how long I should hold each pose (3o seconds, according to the article), and it even lets me schedule the sessions and adds them to my calendar.
The app does have written descriptions of each pose, but those are not visible during the routine. Since I am not currently working with an instructor, I wanted a refresher on how to perform the poses. While I was looking them up on YouTube, I created the playlist below to help me learn the poses. The playlist runs approximately 46 minutes.
If you give it a try, let me know how it goes for you.
This year, The Loft has exploded with professional development opportunities. Unfortunately, as someone who just moved from being a technology coach back to being a classroom teacher, I was so busy with the day-to-day life of the classroom that I did not find time to attend any of the offerings.
Fortunately for me, the tech team found a way to give graduate credit for attending the professional development offerings. My need for graduate credits to support the five-year renewal of my teaching license moved attending the workshops from a want to a need. Despite knowing the prep time I used to attend the course would come out of my sleep time, I was looking forward to attending. I expected to be made familiar with a few new tech tools and see a variety of options for making use of those tools in the classroom. That would be a useful format for me, especially second semester when I was not paddling quite as frantically to be prepared to teach each day.
As useful as that would have been, The Loft professional development was much more. Instead of focusing on tools, the sessions were built around Best Practices, showing how technology could be leveraged to support and extend those practices. Big ideas such as differentiation and assessment were the core of each session, and all of the tools supported that work.
For example, one session was titled Google Spreadsheets: Classroom Applications, Visualizing Data, and Assessment. It did start out with some low hanging fruit, such as a really flexible student picker that I probably used weekly for making pairs, triads, splitting into teams, etc. It also showed an easy way to generate flashcards that will be useful next year. I am eager to try the quiz show generator. My students find that to be an engaging way to review for tests, and the site I have been using is cumbersome and the font is too small.
Then the session moved into the heavy lifting uses. I had already been using the Google Sheets script Autocrat for years. However, I had only been using it for mail merging personalized letters. This session blew me away with the powerful uses. Then it brought in other scripts such as Doc Appender and the one I have used but can not find as I write this, that let me take that data and pull it into a book-like document with a page for each record. So. Incredibly. Useful.
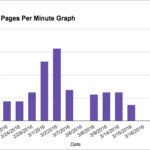
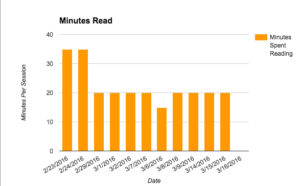
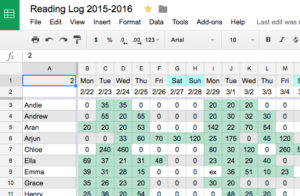
I went home that night and worked until the wee hours applying what I had learned to solve niggling problems. I revamped my reading log system. I created a spreadsheet with a tab for each child. The children went in and entered their reading log data each data. They could have it auto-fill titles which they loved. The data automatically populated two charts. One showed their pages per minute average, and the other tracked their time spent reading. Those were motivating to some of my students.
Next, I worked with my tech coach, Shaun Kirkwood, whose spreadsheet wizardry far outstrips my own. He added magical formulas which totaled each child’s reading on a class summary sheet, regardless of how many entries they made in a day. This saved me tons of time every day.
After that, I created a form to push my students’ thinking about their reading. I used Doc Appender to feed that data into a page for each child. This page made it easy for the children, their families, and for me to track the growth in their thinking about reading.
Later that time, I continued to work with my tech coach to refine the process. I have not yet decided which format worked best, but all were much more useful to me and to the students – even if the students did not like them.
My next step, besides deciding on which reading logs to use next year, is to develop conferencing forms. The same method of a Google Form combined with Doc Appender will let me quickly take notes while conferencing, and then view a child’s data all in one place. I am trying to think of ways to use the main response spreadsheet to easily tell how often and how recently I have conferenced with each child.
Another step is to figure out how to use these with book clubs. Sometimes, I’ve used my book clubs. The YouTube session taught me about adding annotations and bookmarks into YouTube videos. I already have my students record their discussions and upload them to our class YouTube channel. I think I can use the new skills from that session to help them better reflect on their discussions which should lead to more growth.
I am out of space and still have many other sessions to discuss, such as the Game-Based Learning, the changes to TouchCast which I haven’t used yet with my students, but feel better able to tackle now, and how useful it was to be forced to learn more about Google Photos – an application I’ve had a love –hate relationship with since it was introduced. Thanks to this session, I was able to help my students use it more effectively.
But now, it is summer. I am writing this from a lovely garden in Ubud, Bali. Doves are cooing in the trees and ducks are quacking in the rice paddy. It is time for teachers and their instructors to unplug and decompress. Thank you for a great quarter of learning.
For me, one measure of an effective writing lesson is when my students are all clamoring to share what they just wrote, and spontaneous conferences are happening all over the room. That is finally happening in my writing workshop thanks to great resources found online and shared by colleagues.
We’ve been working on narrative writing with lots of flash drafting to increase volume and stamina. Lots of different topics were generated to give us a rich bank of ideas and options. It was all fine, but not great. As we worked on selecting flash draft to flesh out into a full narrative, we revisited some earlier lessons.
I’ve been discussing with them that if you just want to tell about an event in chronological order, write a recount. A narrative is a story. It has a story arc. It has a life lesson or the character grows or changes in some way. Students seemed willing to believe me, but they were having trouble using the techniques of narrative writing to turn their recounts into narratives.
On Monday we revisited writing strong leads. I was fortunate to find this great presentation online: Three Types of Narrative Leads. The mentor text examples at the start were useful, but the real power came at the end where is showed three different leads for the same narrative. Students burst out with comments about how powerful the leads were and which one they thought was best. During their work time, some students actually crafted multiple leads and then selected which one worked best. Many of their leads were strongly influenced by the powerful examples from the presentation. Some students started with one type of lead but then abandoned it and tried a different type. All were focused during the writing session.
During our closing circle, they shared which type of lead they were trying. Many had watered the styles down by combining them, but most students now had a stronger lead than what they’d had before. Success!
(Note: I also had this handout on narrative leads available, but none of my students ended up using it.)
Today we revisited another narrative technique: slowing down the heart of the story. I ran out of time to make a lovely presentation but even displaying this document and reading it aloud was highly effective. Then, based on a lesson from my school’s excellent mini-literacy institute last spring, I showed this video clip.
I did not teach this part as masterfully as Scott Reilly did in the institute. Fortunately, it is such a great teaching tool that it worked anyhow.
The first time through I kept stopping it, pointing out all the details of how the perspective kept switching, of the sounds, the sights, the expressions, the postures, the word choice, the camera angle and especially the speed. Then we watched it again straight through. Finally, I sent them off to find the heart of their narrative and to slow it down so we could experience it with them.
Students dug into their writing and it worked. Soon students were waving me over or dashing across the room, eager to share what they had written. Spontaneous writing conferences started breaking out around the room as students, with heads together, shared the part they had just slowed down.
By this time I had despaired of helping my low volume writer truly expand his writing. Both my instructional assistant and I were both at a loss for what else to try with him since we’d tried all the “tricks” in our bag over the past month. He was miserably discouraged and kept saying, “I don’t understand how to do that.”
For some reason, this mini-lesson clicked with him. He got right to work. He slowed down one part of his so much (and so effectively) that the slowed section was now longer than the original piece had been. His face was alight with his success and as he walked away he said, “I just figured out how I can slow down this last sentences. I can make it better.”
In the end, all but four students had identified the heart and worked at slowing it down. In our closing circle students did not read aloud, they just verbally told us about the part they had worked on slowing down. As students shared, frequent interjections and exclamations were heard from their classmates because they could “see” how effective the slow down would be. Examples included the slowed down portion of a water balloon or snowball fight. The slowed down moment when their friend decided to touch his tongue to the metal bar at the top of the ski lift. The slowed down moment at the funeral when they viewed their uncle’s body for the last time.
It is so rewarding to see students excited about crafting their writing and eager to share their work. I feel great gratitude to the people who took time to share the excellent resources online which inspired my students to these new heights. Thank you.
On most days, my students have the choice of writing by hand in their notebook or typing on their digital writing notebook during our writing workshop. Now they have a third option, voice-to-text dictation.
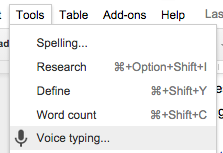
Last week, instead of a writing mini-lesson, we had a tool mini-lesson. They all grabbed their earbuds and laptops so I could introduce the new Google Docs Voice Typing tool.
To use the tool, open a Google Doc. Position your cursor where you want to type. Then go to the Tools menu and select Voice Typing.
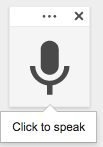
A microphone icon appears on the screen. Click it to start dictating. You may be prompted to enable dictation or to allow it to access your microphone the first time you try this.
After I modeled how to set up the Voice Typing Tool, my students opened a link to this guide to dictating with Siri. The commands work on a Mac or on an iPad/iPhone. We went over the common commands they needed such a period, comma, new paragraph, etc. Some commands worked reliably. Others, such as quotes on or caps on were more challenging to use.
After a bit of practicing with the voice commands, students were ready to work. They spread out into quiet nooks and crannies around the room and started flash drafting another narrative. After a bit of trial and error, most children were successful. They were able to resist correcting mistakes immediately. I encourage them to correct at the end of a paragraph since often, typos are auto-corrected when you keep speaking. They learned how quickly and clearly they needed to speak. A few students have trouble speaking clearly and coherently in general and their dictation reflected that.
As the work session progressed, excitement started to rise. For some students, their writing was finally able to keep up with their thoughts. Up until now, their volume was limited by the physical act of writing or typing. Suddenly, instead of a paragraph, they were writing a page or more. Some wrote two pages in that time. Soon students were eagerly waving me over, proud to show me how much they had accomplished.
All of that would have been enough, but there was more. Moving into our school in fifth grade can be challenging if the child is not coming from a school which follows the Common Core and uses the CTC model of writing workshop. In fifth grade, a good rule of thumb is that students should be writing around a page per session. One of my new students was barely writing a paragraph each day. In contrast, during this lesson, he drafted three pieces. None of them were long but all were longer than anything else he had written so far and together they filled a page and a half. He was elated, and so was I. The next morning, the first words he said to me were, “When are we writing today? Can I dictate it?” Even better, by this week, he is already transitioning to typing. His writer’s block is easing.
Do you have a digital component to your writing workshop? Are any of your students using voice-to-text dictation? I’d love to hear what is and isn’t working for you.
My first school year back in the classroom is well launched. Week 1 was about getting to know each other and starting to feel safe together – they all knew they’d have a test during week two to prove they knew the first name of everyone in the class. It was also about supporting new students as they find their way around our large school and our many systems. It was starting to establish key elements of our classroom, such as morning meeting, circle up behavior, laptop and iPad launch. It was working on stamina when reading or writing or listening to a lesson.
Week 2 was deeper community building and scads of pre-assessments. It was beginning of year math test, reading pre-assessment, on-demand writing, spelling inventory and spelling n0-excuse words. It was pre-testing in XtraMath and FrontRow. Along with that came more work on routines and expectations. It was me seeing everything and celebrating as much as I could. “I see we are only filling half of the hallway so that other classes can easily get by us.” “I see everyone was almost seated correctly in the group area when the song ended.” “I see you remembered to have a book for silent reading today.”
Week 3 wasn’t as fun. It was time to pull up their behavior, communicating that they will look at the person who is talking during a group discussion. They will lower the laptop lids or flip their iPads when requested or live with the consequences of their decision. They will start understanding what quality effort looks like. They were surprised and didn’t like the change, which tells me I need to do a bit of that earlier next year, and weave it in more joyfully.
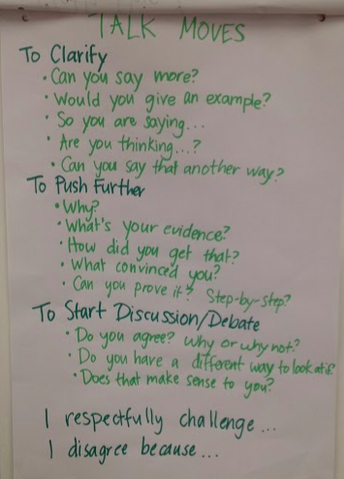
I also made an anchor chart but I’ve pictured hers here since it is much neater than mine.
First a reflection: next time I teach this lesson, I will model the talk moves better to eliminate the initial confusion students showed when I set them to work.
Once we were past that, I was encouraged by the progress they made. Only my top two math students were unsuccessful, believing their answers were so self-evident that there could be no discussion. (When after the second round they still had not succeeded, they were shocked to have me calmly explained that they had failed the assignment and were not yet showing they were on the way to discussing math like mathematicians. It felt harsh; hopefully it helps them grow.)
While I was pleased with how the lesson went, I didn’t realize its larger impact until later in the day and week. That afternoon, during our closing circle they were sharing suggestions of what we could do to make a better transition from recess back to being ready to learn in the classroom. To my surprise and delight, without being prompted they used their talk moves. I was hearing, “Can you explain that more clearly?” and “I respectfully disagree with Bill because….” This instantly elevated our closing circle from sharing to genuine discussion as they challenged and extended each other’s ideas.
Earlier in the week I had launched our class Edmodo account. I wanted a place for asynchronous discussions so that we could have deeper thought and hear more from our quieter members. As you would expect, the first discussion we attempted was less than perfect. Students were so eager to take part that they wrote without anything to say. There was barely contained chaos where they tested whether I really meant no chat language and that the conversation needed to be as respectful as our fac-to-face ones. They also did not yet understand exactly where their replies should be so the effect was a bit like buckshot.
After our accountable talk math lesson we again used Edmodo. This time it was to create a fun, rain day plan in case our field trip was rained out. The difference was dramatic. They had actual discourse, asking for clarification, building on each other’s ideas, and respectfully challenging others. Most were using conventional grammar as well.
Throughout the week, the accountable talk seemed to weave itself effortlessly into our community. With how this group loves to talk -and don’t all fifth grade classes love to talk- accountable talk was a bit of low hanging fruit easily added to our learning toolbox. I will definitely use this lesson again next year. I’ll will teach it earlier.
How do you teach accountable talk? Please share what resources and methods do you use.
 The shortcut ends up with the colorful Formative logo on it which makes it easy for the students to locate it.
 Is it incorrect? It certainly isn’t the most efficient way to model 1.82 since the hundredths are not with the tenths. This child and I had a quick and focused discussion about her response. After that, she gave me a treat that teachers live for. Her eyes went wide, she said, “Oh! I see a better way to draw it” and enthusiastically rushed off to make changes. My experiences have shown me that if the other children had checked in with me before submitting, most would have shown similar growth.